June 5, 2010

Fourth Grade

It has been a few since I updated, but I will keep on keeping on.


Fourth Grade : Gold Trees Inspired by Gustav Klimt

The project with fourth grade was a great one, and not only because everyone got a chance to use gold paint (magic), but also because of how personal and unique each project turned out to be. This lesson was introduced by first letting the kids take a close look at Gustav Klimt's Tree of Life painting, noticing all of the symbols, techniques and ideas that they could see in his work.


After each student had a chance to look for a minute or two, I talked a little about Gustav Klimt, pointed out on the map where he was from, and showed a couple other examples of his paintings. I let the kids start a group discussion and share ideas about what they saw in the painting. Some of the responses were geometric shapes, spiraling branches, colors in the tree, eyes and other symbols, and colors and patterns in the ground. We also talked about sketchbooks, and how artists come up with ideas when they're working on a project. It made me happy when a few kids said, "I have a sketchbook that I draw in at home!" How awesome is that, and I told everyone, the project is almost going to be like a self portrait, because you are going to add symbols to your tree with cut paper that say something about you and the things that you like. We talked about why the painting may have been called tree of life, and I remember one student saying, "maybe because the artist wanted to show things in their life that are special."


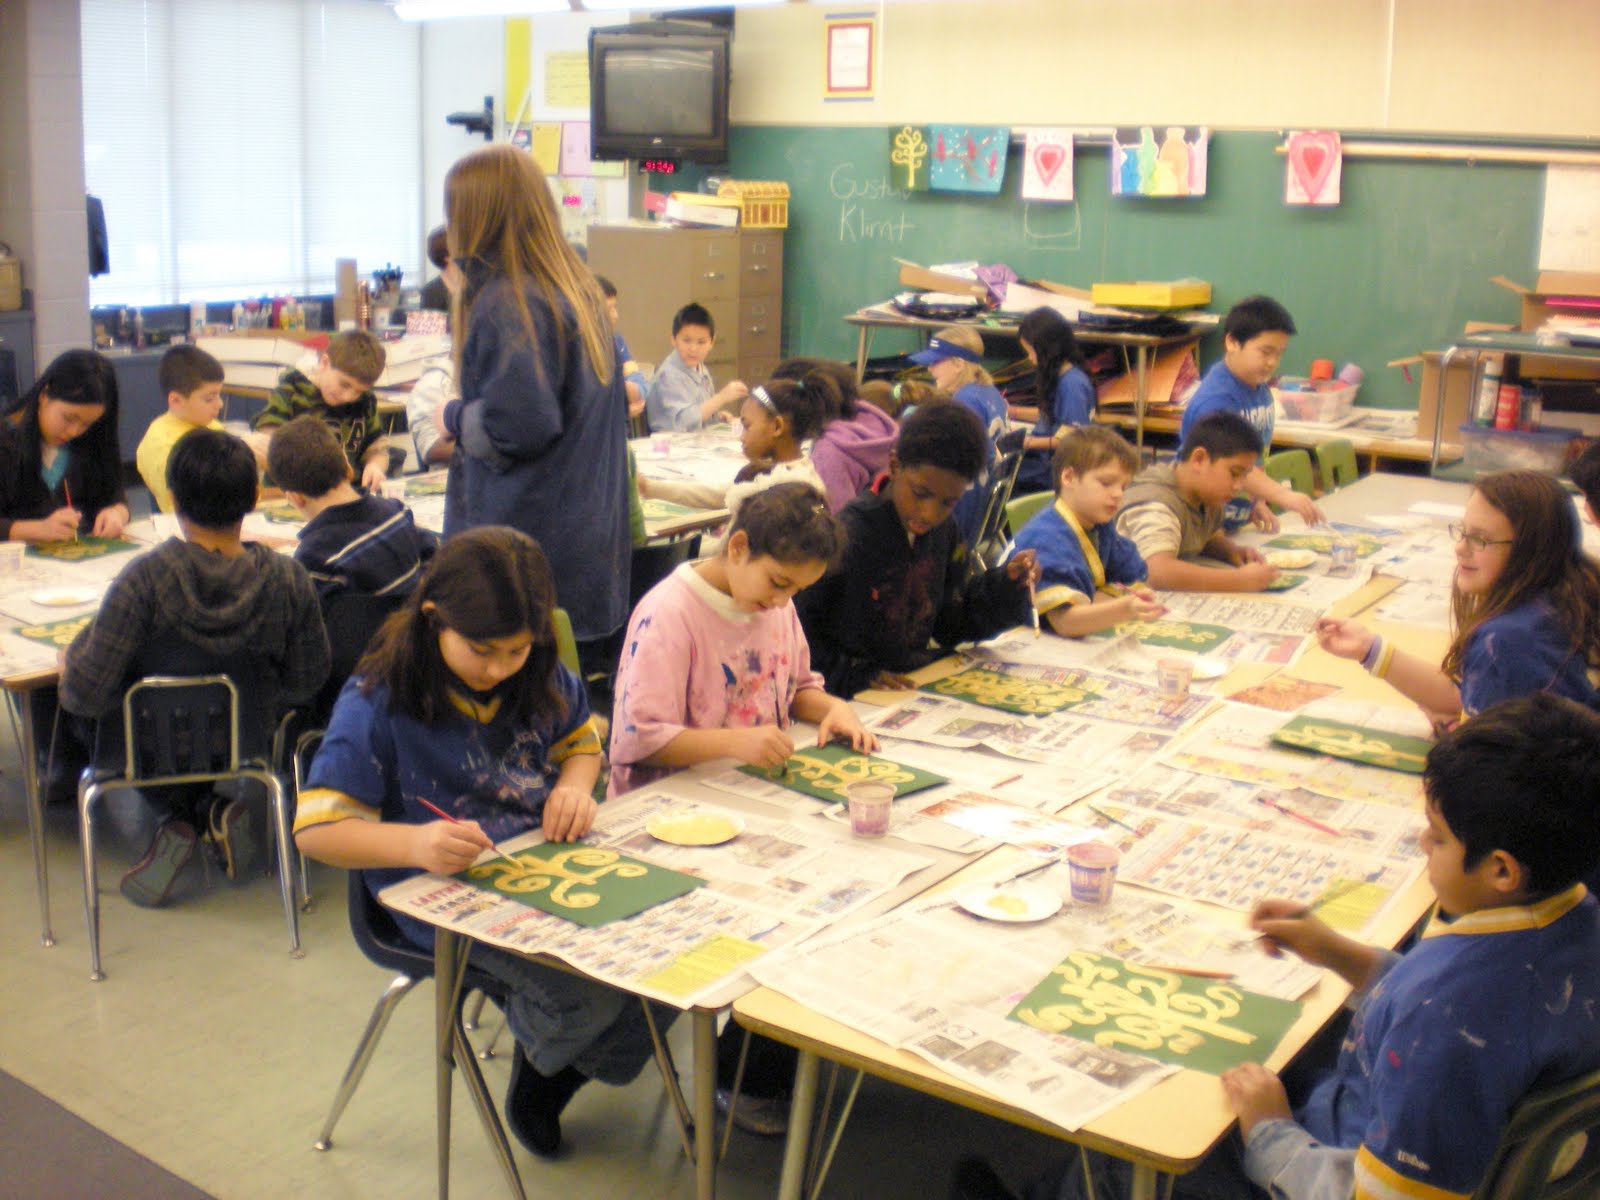
This photo is of in progress trees, and shows how the students began by painting the tree, and then added cut shapes (colored for the ground, black and white for in the tree)


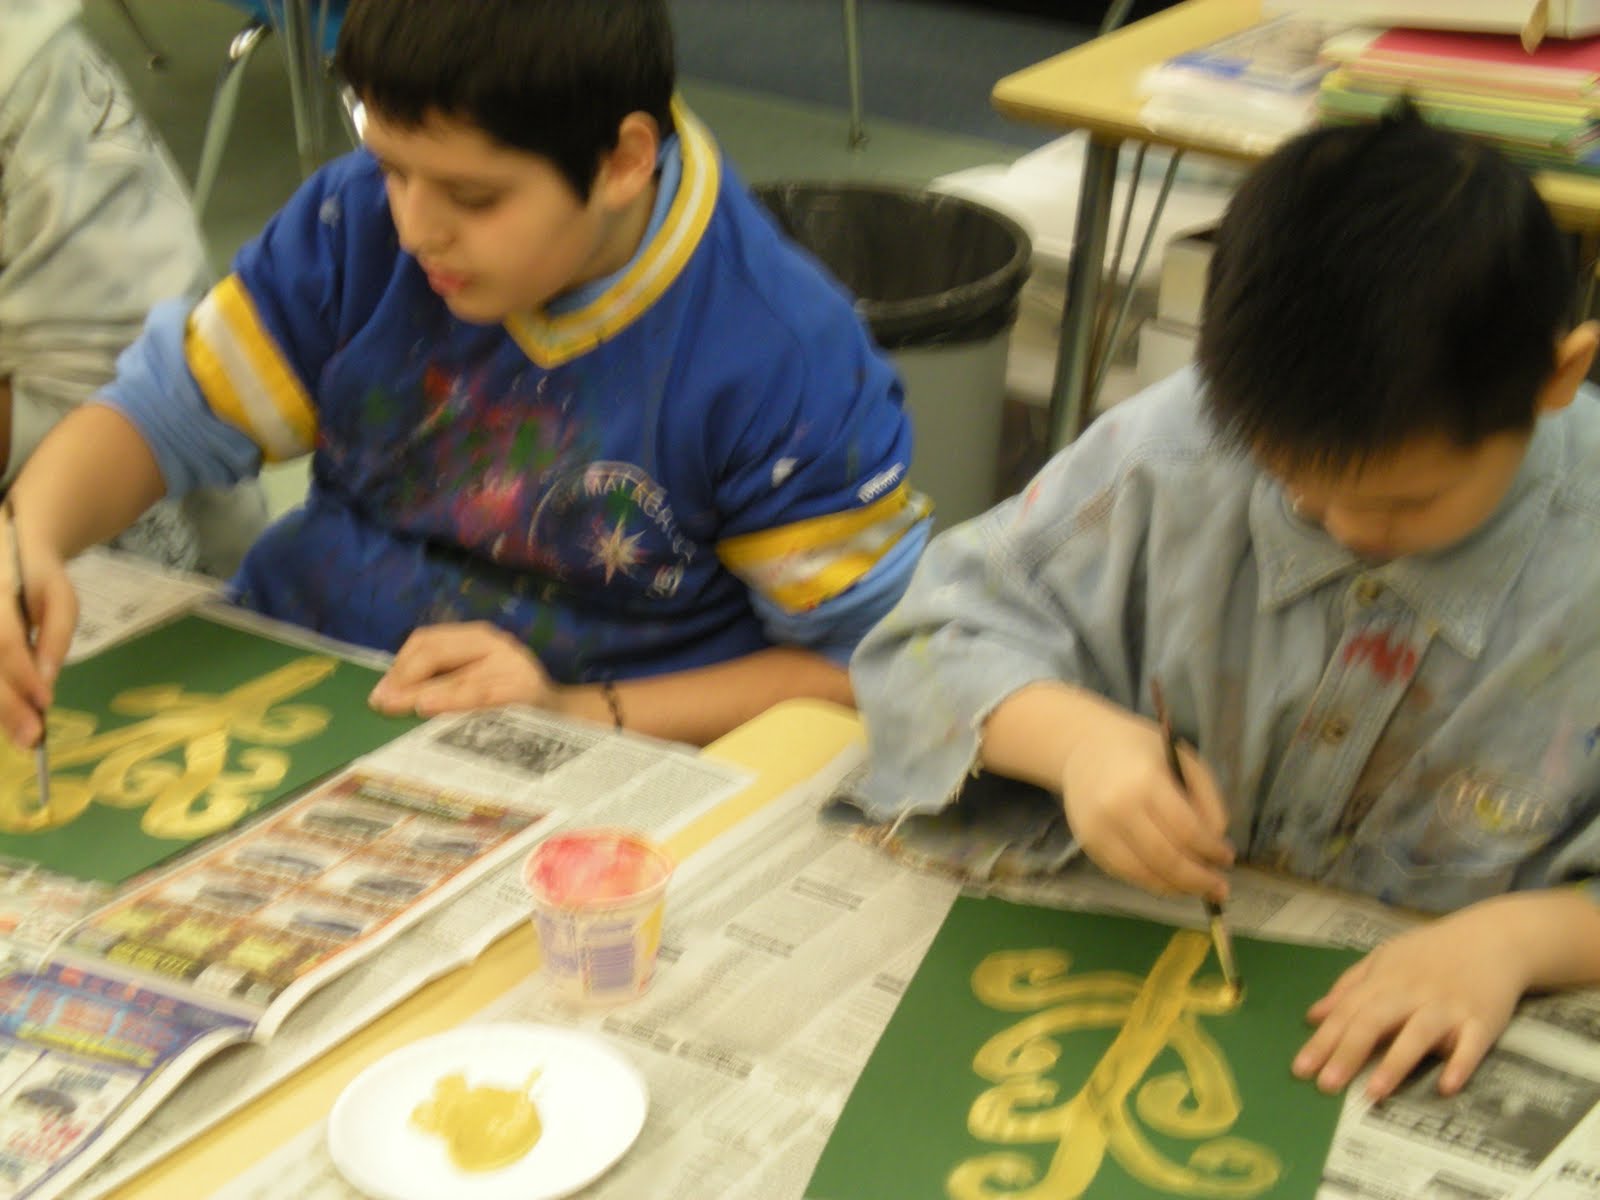
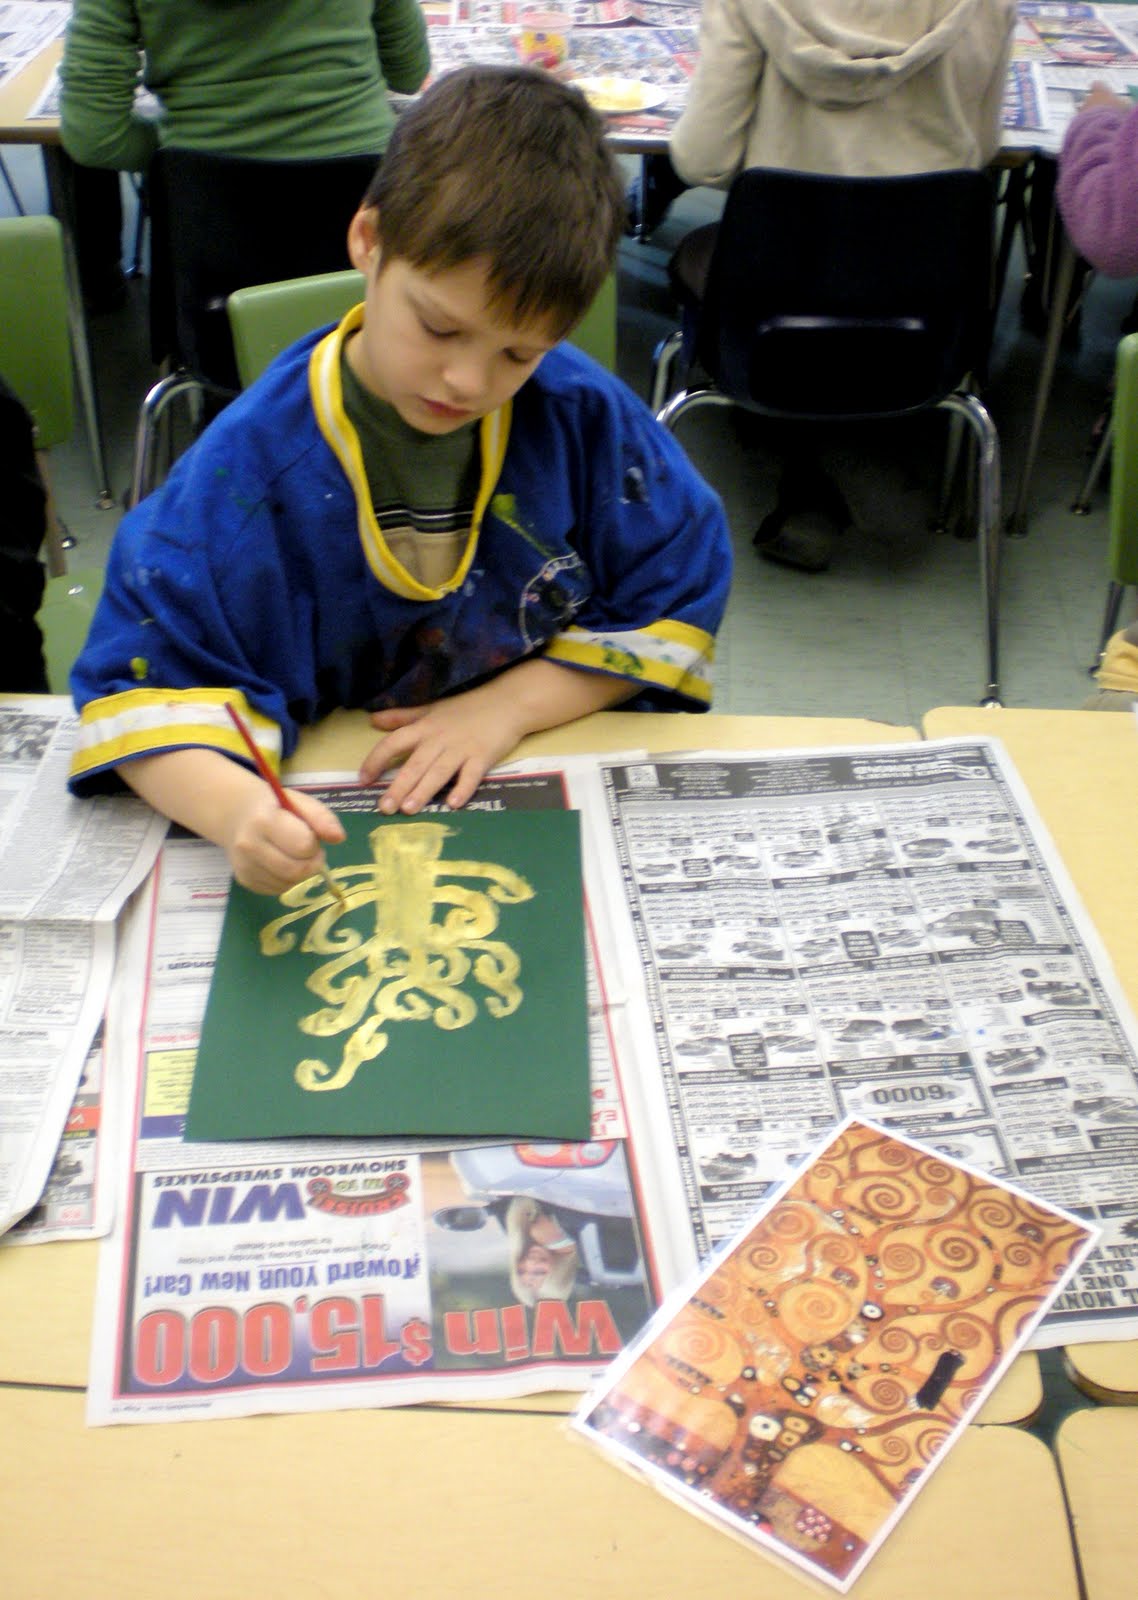
I did a demo on how easy and fun it is to use the gold paint to make the spiral branches, by making a trunk, and then adding the branches out from the trunk. I showed them how to hold the brush straight so they had more control over it, and how the branches can be added to fill the space on their paper. I kept a reproduction of Gustav Klimt's painting at each table so the students could refer back to it when working, and also be inspired by it. There are so many wonderful things to be looked at in that piece.


The kids were awesome at painting because they love it, and the gold tempera also helped. They also became fascinated with how the water cup looked after they rinsed their brush. "WOAHHH, MAGIC WATER!" Haha it was fun.


Overall, a great assignment that turned out beautifully. I also loved walking around the room and asking each student while they were working what kinds of things the shapes they were going to use represented. Their responses were all unique, and you could tell when they were talking about it that they were really thinking in depth, at how they would represent each thing with simple black and white shapes. I was lucky to be able to work with such a creative bunch :)


May 25, 2010

Third Grade, Part DOS

Lesson 2 of 2 that I did with the third graders at Angus & Jefferson. Here it is!

THIRD GRADE : SELF-PORTRAITS INSPIRED BY MODIGLIANI

I find it not only easy to do, but fun for myself and the students when art history is integrated into a lesson. The students have something to refer back to in the learning process, and it introduces them to the beauty of the artwork from artists that the students may never hear about at any other time in their life besides art class. I introduced the third grade classes to self-portraits, which every student was terrified about when I first introduced the lesson. When the most gifted art student in a class raises his hand and says, "I don't think I'm going to be able to do this, I can't draw my own face," you know this is going to be a challenge. But I told the whole class, "don't worry, I'm going to show you how to make a face using just simple shapes that you all can draw as well, and I'll help you with every step, and EVERYONE is going to be able to do this, I promise." Normally I wouldn't promise hardly anything to a bunch of 8 year olds if I was only half-sure about what their abilities would let them do, but I felt like I knew these kids for 6 weeks, and I knew their gifts and talents and that they hide behind low self-confidence. Once they see what they can do, they'll be sad that they ever doubted themselves. In reality, I was giving a lesson aimed at 5th graders to several groups of 3rd graders. I knew they could take on this challenge. I thought, if they won't have confidence in themselves, I'll have excessive confidence for every single one of them.


I began by hanging up several portraits done by Amedeo Modigliani on the board. Without telling them who did these or why they looked the way they did, I had the class study them briefly, and then we had a group discussion where they identified common traits they noticed within the portraits.


I told them a little bit about Modigliani, and how he would draw up to 100 portraits a day in the later part of his life (I left out parts about the absinthe and the mental disorders). We talked about shapes that we could see him using in each portrait, the difference between a realistic portrait and the techniques that Modigliani used, the difference between a portrait and a self-portrait, and they asked questions and talked about what they thought about these portraits. I love hearing kids talk about art, and all of the things that they notice and see and think that things resemble. It's amazing.


So then I did a demo of the steps of a Modigliani style self portrait. I got a mirror and drew myself for them, and I explained each step and why I was doing what I did. I think this helped make the assignment less intimidating when they knew what they should start with, what shapes they could use, and that it was possible to hold a mirror and draw at the same time. I also talked about elongating and exaggerating. I gave myself a long neck and a long oval face, taking up most of the 12" x 18" paper I was giving them. I told them to look at themselves in the mirror and study what they saw before they began drawing. Notice if you have round eyes or oval shaped eyes, if you have thin lips or lips that are more rounded, add in things like glasses or how your hair sits on your forehead, what color eyes you have, etc. because all of those things make you unique and make your self-portrait stand out and look the most like you. I told them not to aim for hyper-realism, that we were going to have fun, use simple shapes, and do something different.


Everyone began their drawings with pencil. Once they were completed, they would outline in Sharpie marker, and then use colored pencils for their hair, skin, eyes, lips, etc. I told them to leave their clothing blank until the end, because then I pulled out the best art supply ever invented for 8 year olds...color changing markers. I told them they could use these to color their shirts and make cool patterns. They loved it!


This project was definately one of the more difficult concepts for the kids to grasp, but they did a wonderful job, listened well, and really learned something about their own skills and abilities. I told them at the very end when everyone was done, that this project was supposed to be for 5th grade, but that I gave it to them because I knew they could do it, even though they didn't think so themselves at the beginning. I saw them looking at their work after I told them that, then looking at me, then smiling, because I think that was the point they all realized that they are all talented, and that they should never doubt how artistic they are :)


Me with Mr. Russell's third grade class on my last day of elementary school. They all planned to surprise me and group-hug me at the end of class. They did, and Mrs. Clinton was nice enough to photograph this moment. I miss and love these kids so much!


May 21, 2010

Third Grade, Part Uno

My third graders were so talented and speedy that I was lucky enough to be able to do not just one, but two projects with them during my elementrary placement. The first project that I did was, I feel, the most successful project that I did during my elementary placement. I say this because 98% of the results were astounding...they followed all directions, tried their best, applied the concepts, and their projects turned out beautiful. It is a thrill when I get to put every child's assignment up in the hallway and have all of the staff and students give compliments on the work. The kids were very proud of themselves. One student's project even won Best in Show at the Warren Consolidated Art Show last week :)


So ANYWAY, here it is!


THIRD GRADE: WARM AND COOL BEECH TREES : INSPIRED BY GUSTAV KLIMT


When I was creating this assignment, I had in mind two concepts for the kids to learn...contrast, and warm & cool colors (or is that 3 concepts? hmmm...). So what I did to begin with was introduce them to an artist that many of them had never heard of before. I made a large copy of Gustav Klimt's Beech Tree Forest I


and I laminated it and began the lesson by holding this image, walking around the class, and letting each student get a chance to study this up close. I prefaced it by telling them, "I'm not going to tell you what this image is, or who did it, I just want everyone to look and pick out some things that you see, keep them in mind, and we'll all talk about it after everyone gets a chance to see this."

I LOVED looking at their faces as they looked at this up close. Some were excited by all of the colors and details they saw, others were confused, others were pointing at things and whispering to their friends next to them...it's the little things that make me excited to be a teacher.

After I went around the class, I asked everyone to raise their hand and tell me something that they saw. Some said tree trunks, some said dots, some said fall, some said forest, some said yellow, orange, blue, green, etc. Then I taped this up and I made a chart on the board. One column said "Warm Colors" and one said "Cool Colors." Then I had the kids raise their hand and tell me which column each color went into. By the time we were done, we had orange, red and yellow on one side, and then blue, green and purple on the other. I talked about how these colors are used, and then as a class we picked out where each color was in Klimt's painting. It wasn't until we all did this as a class that many students realized that ALL of those colors were somewhere in the painting.

Then I did a demo on their assignment. I showed them an example of their final project that I had already created, and each third grade class I showed this too would say, "WOWWWW, THAT'S GOOD! I CAN'T DO THAT THOUGH!!" And I would say "ohhhh, yes you can because you are all great artists."

I showed them that all I did to create the tree trunks was to take a strip of poster board and a little black tempera paint on a paper plate, dip the edge of the poster board in the paint, and scrape the paint across the paper. The poster board would create the edge of the trunk, and the scraping motion would give them a bark-like texture. Leave a space, do the same technique moving the opposite direction, and you have a tree trunk! I felt like David Copperfield because it was like I did some crazy magic, but I told them, "see how easy it is? Now you know you can all do this too!" So then they scurried to get their little paint shirts on and I handed out supplies and they went nuts (and did a great job). I even taught them a little bit about perspective, and how each trunk can start at a different point on the ground and as you move them up, it looks like they are going further back in the forest, just like in Gustav Klimt's painting. For third grade, I thought most of them followed this concept well!

I taught the contrast aspect to them, explaining that the trees were going to be left in only black and white. They would stand out more when we add all of the beautiful colors to the rest of the picture. To finish the scenery with warm and cool colors, I told them they would pick either warm or cool colors to do the sky with watercolors, and whatever they picked for the sky, they would do the opposite for the ground with crayons and texture rubbing plates. So if they did blue, green and purple for the sky, they would use yellow, orange and red on the ground. They used at least 2 different texture rubbing plates each for the ground to create a cool design, and I showed them how to do a wet-on-wet watercolor technique to make a gradient look for the sky. Again, magic haha.

I think every student's self confidence got a boost with this assignment. Like I mentioned earlier, I threw A LOT at them, and they took to it like champs and their results were nothing short of amazing. Here are some examples...


May 20, 2010

Second Grade

Time to continue on with lessons. Here is what the second grade classes did for their project with me...


SECOND GRADE: ROBOTS IN OUTER SPACE


This lesson was all about shapes, textures, and experiments. The first thing that I did with the kids was read them this wonderful story


I told them while I was reading and showing them the illustrations to really look at the robots, and notice what different geometric shapes make up parts of their bodies, and how each robot is a little different from the next robot. We also reviewed the shapes so that they would know what to look for, so I just asked, "what shapes do we know that we've learned to use in art class?" So we reviewed circles, rectangles, triangles, squares, ovals, etc. That way, they could enjoy the story and the illustrations while still thinking about ways you can build a robot.


After the story, I told them about how they would each get a piece of black 9" x 12" construction paper and everyone at their tables would share metallic and glitter crayons, and what they would do is create an outer space background with planets, rocket ships, stars, space ships, comets...pretty much whatever they wanted. I did a demo on some ways that they could use the crayons to create these things. I showed them how to take the metallic crayons, press hard to make a shiny dot, and very lightly color around the dot to make a glowing star (which is much better than those awful 5 point stars that they like to make sometimes. I did a nice dramatic speech about how second graders can draw much prettier and more realistic looking stars and I drew one of those 5 point stars on the chalkboard and drew a big X through it. They laughed a lot at that one). I also showed them how they can layer different colors of crayons on top of eachother to make a fun looking planet. Finally, I did a demo on how easy it is to draw a spaceship using just ovals and circles (and zig-zag lines for lasers).


So after this hullabaloo, and while they were coloring and making spaceship noises to themselves, I was cutting 8273472637485 squares of neon paper like a fiend for them to build their robots out of. I told them that the only part of their project that would have hand drawing or coloring would be on the background. Every part of their robot was going to be cut out of paper.

Then when I handed out the papers, I did another demo on different ways they could fold their paper to make fun robot parts. I showed them accordian or fan folds to make arms and legs, I showed them how to cut the paper to make a window for a helmet, and I showed them how to make a little door for either a battery pack or for where the buttons hide. They had so much fun with this. I told them when they were all done with their bodies, that if they wanted neon pipe cleaners for their antennas, arms, or legs, I would help them attatch those to their papers. I showed them that they could wrap the pipe cleaners around a pencil to make them wiggly, or that they could do an accordian fold on a pipe cleaner just like they did on their papers for a zig-zag. Then after allll of this was done, I brought out the googly eyes. Everything looks better with googly eyes. I told them they could have 2 googly eyes if they wanted, and of course, most of them did.

I absolutely loved doing every step of this project. The kids got a chance to build on their knowledge of shapes and textures, really use their imaginations and creativity, relate everything back to a story, and learn new ways to use materials that they've already tried before. It was a project I would DEFINATELY do again :)


May 17, 2010

I Can Be A REAL Teacher Now!

Well, it's all happening (to quote my favorite movie). I graduated on Thursday with my BFA in Illustration, and my LQ 95 Visual Arts Endorsement for my Visual Arts Teaching Certification K-12. Now, I am on a journey to find a new career in a new town. The past 5 years have been amazing, and I wouldn't have traded one moment for anything else.


I want to get back into the blog now that I have a slight amount of free time on my hands. I was fortunate enough to see some of my good friends last night and they all inspired me to log in today and finally make an entry! Thanks you guys, you are all truly wonderful people.


I'd like to post an entry for each lesson that I did with my student teaching experience. I hope that some of my entries and the results will inspire people as much as these kids have inspired me with all of their talent and enthusiasm. I'll start from the lowest grade, and work my way up :)


KINDERGARTEN : MONSTERS INSPIRED BY WHERE THE WILD THINGS ARE


While I was student teaching at the elementary level, I was traveling back and forth between 2 schools. I would go to Angus Elementary in the morning until 11 am, and I would then travel to Jefferson Elementary for the afternoon, giving me the chance to work with even more kids and get to know two different schools in the Warren Consolidated district. I did essentially the same projects in both schools for each grade level, but I got to know a lot more Kindergarten students at Jefferson.


The premise for this lesson was for each student to look at and think about the monsters in the story, and take inspiration from that in addition to using their crazy 5-year old imaginations and create a monster of their own. They could use flourescent crayons and construction paper crayons (which, if you haven't seen or tried these before, DO IT! Trust me, you don't have to be in elementary school to appreciate Crayola Construction Paper Crayons) to draw and color in their monster. Their monster could have as many heads, eyes, arms, legs, fur, claws, horns, noses or teeth as they wanted, but EVERY space or feature had to be filled with color. Sounds like an easy concept, but 5-year olds get excited and expect to be done quick, so they always need a little extra reminder that "no Mr. White can show on the paper!" When their monster is completed, I helped to cut each monster out for them. They received a large piece of dark green paper, leaf rubbing plates, and short crayons, and they had to fill their green paper with crayon rubbings that would overlap to create a "jungle," just like what Max's room turned into in the story. I also provided them with lime green and darker green construction paper. They tore strips of the paper and pasted them to their green paper to create vines and grass in the jungle. Finally, they could glue their monster in their jungle and the final touch was me running around gluing "googly eyes" to each monster. There was a limit of 2 googly eyes, since some kids had 100 eyes on their monster and I only have 2 hands, 1 glue bottle, and 30 kids in a class.


I began by reading each Kindergarten class the story Where The Wild Things Are by Maurice Sendak, an all-time classic in children's literature and illustration (but you already knew that I'm sure). The kids were so energetic and excited about the illustrations that I got a rush each time I flipped the book around to show all of the kids on the carpet. Being an illustrator and a teacher, I just loved seeing the expressions on their faces in response to the illustrations and the connections that they could make when they created their own monster. I reminded them of what the monsters looked like while they were working by walking around the room, showing them pages from the story. Even though they were inspired by Maurice's monsters, I had very creative children and these are some of the monsters they came up with...


This is the paper I made to hang in the hallway with their projects


March 3, 2010

This will make me stay in Michigan...


No one will ever really know how much it hurts to leave Jane Clinton and Jefferson Elementary and Angus Elementary to go to a high school placement where no one is going to make me awesome gifts like this...and if I could scan every single card or drawing that I got from these kids, I would. I want to make some entries about each project that I did with them, I just have to wait for my pictures to get developed. I have gotten way too attached to these kids. I've had art with roughly 1300 kids these past 8 weeks. I would not be as fulfilled as I am now if it weren't for these amazing children. No others could take their place. I'm so lucky to have had this experience, and I will never forget it